Amazon Keyword Harvesting: A Weekly PPC Routine
Amazon keyword harvesting is the weekly discipline of pulling your Search Term Report, identifying which customer searches actually converted, moving those winners into manual exact-match campaigns where you control the bid, and blocking them in the source campaign so you stop paying twice for the same traffic.
Three things to do right now:
- Download your Sponsored Products Search Term Report for the last 7–14 days
- Flag every search term with at least 8 clicks and at least one order as a harvest candidate
- Add each winner to your manual exact-match campaign, then negate it in the source
Do this consistently and two things happen fast: wasted spend drops because you stop funding terms that never convert, and your best keywords move into campaigns where you set the bid precisely instead of letting Amazon decide.
Table of Contents
- What keyword harvesting actually does for your PPC and organic ranking
- Which reports and data sources you need before harvesting
- How the graduation funnel works: auto → phrase → exact
- The repeatable weekly harvesting workflow
- Which metrics to prioritize and what thresholds to use
- Negative keyword strategy and preventing internal cannibalization
- How harvested keywords should feed your listing SEO
- Tools, automation, and where Selloop fits into the workflow
- How to measure success and verify the impact of harvesting
- Key Takeaways
- The discipline gap is where most sellers lose
- Selloop turns the weekly harvesting loop into a one-click routine
- Useful sources
What keyword harvesting actually does for your PPC and organic ranking
Keyword harvesting is the process of converting noisy discovery spend into controllable, profitable keywords. When you run an auto campaign, Amazon matches your ads to searches it considers relevant. Some of those searches convert. Most don’t. All of them cost money.

The workflow practitioners also call “search term graduation” closes that loop. You graduate proven converters into exact-match manual campaigns and leave the auto campaign to keep finding new territory. Budget consolidates around what works. ACoS tightens. You stop overpaying for broad matches on terms you already know the answer to.
Here is a quick scenario: your auto campaign runs for two weeks on a silicone spatula. The search term “silicone spatula set” racks up 15 clicks and 2 orders at a $1.23 CPC. You graduate it to exact match at a $1.11 opening bid (CPC × 0.9), then negate it in the auto campaign. From that point forward, you own that term at a controlled price.
The organic benefit is real too. Harvested terms are conversion-proven language, which means they carry actual purchase intent. When you feed them into your title, bullets, and backend search terms, you give Amazon’s A10 and COSMO ranking stack the structured, answerable copy it rewards, not a dense synonym list.
- Harvesting shifts budget from discovery to control
- Graduation concentrates spend on proven converters, improving ACoS
- Harvested terms provide the conversion evidence that justifies front-end listing changes
Which reports and data sources you need before harvesting
Pull these before you touch a single keyword:
Primary reports:
- Search Term Report (Sponsored Products and Sponsored Brands): the core source. Shows every customer search that triggered your ads, with impressions, clicks, spend, orders, sales, and ACoS per term.
- Campaign-level performance exports: confirm budget pacing and total spend by campaign before making structural changes.
- Placement reports: useful context for understanding where auto campaigns are winning impressions (top of search vs. rest of search).
- Brand Analytics (Search Query Performance, Top Search Terms, Search Catalog Performance): available to Brand Registry sellers. Adds category-level search volume, conversion share, and click share data that the Search Term Report alone cannot give you.
Columns to export from the Search Term Report:
| Column | Why it matters |
|---|---|
| Search term | The exact customer query |
| Match type | Identifies which campaign type surfaced the term |
| Clicks | Minimum data threshold check |
| Impressions | CTR calculation |
| Spend | Identifies costly non-converters |
| Orders | Primary conversion signal |
| Sales | Revenue attribution |
| ACoS | Profitability check |
| Conversion rate | Statistical quality signal |
| ASIN (if applicable) | Multi-ASIN targeting clarity |
On sampling windows: a 7-day window gives you fresh, actionable signals. A 14-day window adds volume for lower-traffic products. Amazon’s own guidance recommends monitoring keyword performance regularly and adjusting based on new data. Never go beyond 14 days for a weekly harvest — you lose the ability to act on current conditions before they shift.
When Brand Analytics is available, use Search Query Performance to cross-reference your top harvested terms against category-wide conversion share. A term converting well in your campaigns but with low category conversion share may face structural headwinds worth knowing about.
How the graduation funnel works: auto → phrase → exact
The canonical campaign structure has three layers, each serving a distinct purpose.

| Layer | Campaign type | Purpose | Bid posture |
|---|---|---|---|
| Discovery | Auto / broad match | Surface new search terms | Moderate, exploratory |
| Validation | Phrase match | Test term variations at controlled scale | Slightly higher, monitored |
| Control | Exact match (manual) | Own proven terms at precise bids | Optimized, bid-adjusted |
Auto campaigns are prospecting machines. Their job is not to generate revenue directly — it is to surface convertible search terms you can move into manual campaigns. Once a term proves itself in auto, it graduates to phrase match if you want to capture close variations, or straight to exact if the data is already strong. Exact match is where you control the bid precisely and stop overpaying.
Segmentation matters here. Group products by category or lifecycle stage:
- Launch phase: wider auto budgets, lower thresholds for phrase graduation, more tolerance for discovery spend
- Mature SKU: tighter filters, exact match dominates, auto budget trimmed to genuine prospecting
- Multi-ASIN accounts: separate campaigns per product group to prevent cross-ASIN cannibalization
Negatives are what close the loop. Without them, your auto and exact campaigns bid against each other on the same term, inflating your own CPC. Every graduation must be paired with a negative exact match in the source campaign. That is the step most sellers skip.
The repeatable weekly harvesting workflow
Run this every week. It takes 30–45 minutes once you have the habit.
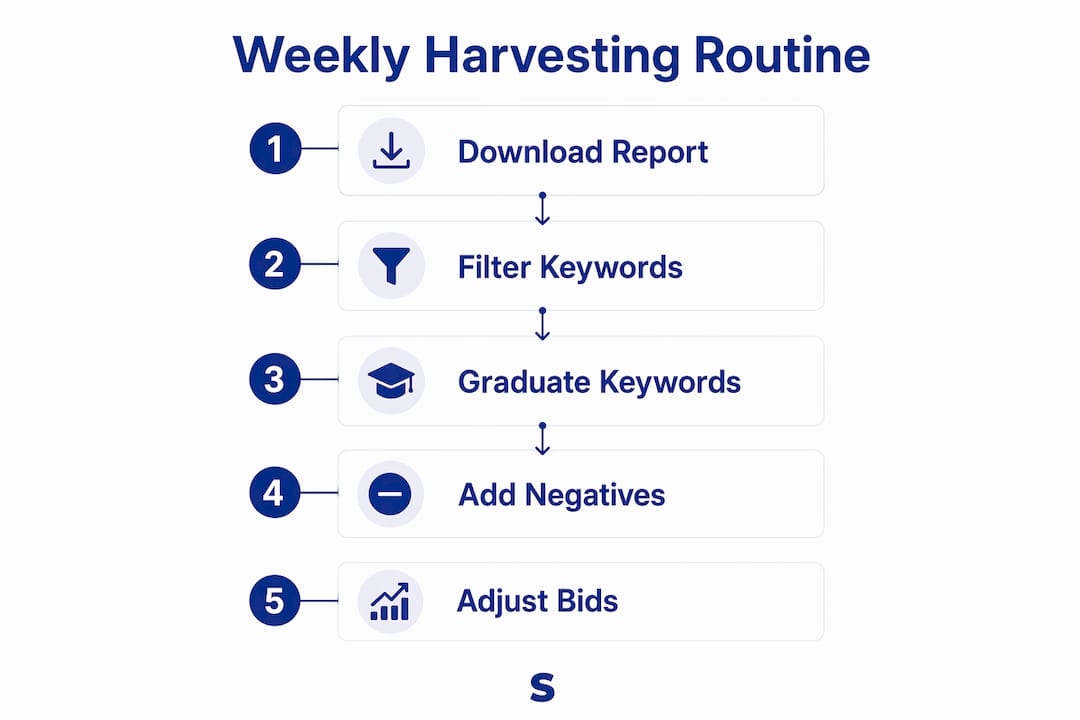
- Download the Search Term Report. Go to Campaign Manager → Measurement & Reporting → Sponsored Ads Reports → Search Term Report. Set the date range to recent days, generally a week to two weeks, to balance timeliness and data volume.
- Filter for minimum 8 clicks. Delete every row with fewer than 8 clicks. Acting on sparser data means promoting statistical noise, not real converters.
- Split into two lists. Converting terms: clicks ≥ 8 AND orders ≥ 1. Non-converting terms: clicks ≥ 8 AND orders = 0 AND spend ≥ $3.
- Handle converting terms. First, check whether the term already exists as a keyword in your exact-match campaign. If it does, skip re-adding it — adjust the bid on the existing keyword instead, then add the term as a negative to the source. If it is new, add it as an exact-match keyword at CPC × 0.9 as the opening bid.
- Add negatives to the source campaign. Every harvested term gets added as a negative exact match to the auto or broad campaign where it was discovered. This is not optional. Skipping it means both campaigns bid on the same term and your auto campaign often wins the auction at an uncontrolled bid.
- Handle non-converting terms. Add high-spend, zero-order terms as negative exact matches to the source campaign. Do not add them at the account level unless you are certain the term is irrelevant across every product you sell.
- Log everything. Record: search term, source campaign, weekly clicks, weekly orders, action taken, opening bid. Six months of this data in one place lets you spot seasonal patterns and avoid re-harvesting terms you already own.
Pro Tip: Never graduate a brand term from your auto campaign into a generic exact-match ad group. Brand terms need their own campaign with separate budgets and attribution. Mixing them inflates ACoS on your non-brand campaigns and muddies performance data.
Which metrics to prioritize and what thresholds to use
Not all converting terms deserve the same urgency. Here is how to triage:
Priority order for decision-making:
- Orders / conversions: the primary gate. No orders = no graduation, regardless of clicks.
- Conversion rate: a 4% CVR on 50 clicks is more trustworthy than a 33% CVR on 3 clicks. Wait for real volume.
- ACoS vs. your target: if ACoS is below target, the term is profitable at current spend. If it is above target but trending down, it may still be worth graduating.
- Spend per conversion: high spend with one order is a warning sign, not a green light.
- CTR: low CTR with high spend suggests the term is triggering irrelevant placements.
Threshold guidance by lifecycle:
- Launch phase: use a 10–20 click minimum and at least 1–2 orders before graduating. You have less historical data, so patience matters more.
- Mature SKU: the 8-click minimum from AmazonFBA.org’s weekly harvesting guide is a solid floor. With more data history, you can tighten to 10+ clicks for higher confidence.
Quick decision tree:
- Clicks ≥ 8, orders ≥ 1, ACoS ≤ target → graduate to exact match
- Clicks ≥ 8, orders ≥ 1, ACoS above target but improving → graduate to phrase match, monitor
- Clicks ≥ 8, orders = 0, spend ≥ $3 → negate in source
- Clicks < 8 → wait, do not act
Statistical significance is the discipline most sellers skip. One conversion on three clicks is not a signal. It is a coin flip. The minimum-click threshold exists precisely to prevent you from acting on luck.
Negative keyword strategy and preventing internal cannibalization
The most common operational failure in keyword harvesting is forgetting to add the harvested term as a negative exact match in the source campaign. When you skip this step, both campaigns bid on the same search term, your auto campaign often wins the auction because its bids are uncapped, and you lose the cost savings you harvested for in the first place.
Here is the step-by-step for adding negatives correctly. For a deeper reference, Selloop’s dedicated post on Amazon negative keywords covers the full strategy.
- Go to the source auto or broad campaign in Campaign Manager
- Click Negative Targeting
- Select Negative Exact (not negative phrase) for terms you are graduating to exact match
- Add the harvested term character-for-character as it appears in the Search Term Report
- Confirm the negative is saved before closing the session
Negative exact vs. negative phrase: use negative exact after graduation. Negative phrase blocks all queries containing that phrase, which can accidentally suppress variations you still want the auto campaign to find. Negative exact is surgical — it blocks only that precise query.
Campaign-level vs. account-level negatives: always default to campaign-level. Account-level negatives block a term across every campaign you run. One misfire at the account level can kill a converting term across multiple products simultaneously.
Cannibalization happens when the same search term runs in both your auto and exact-match campaigns without a negative. The monetary impact is straightforward: two campaigns bidding against each other in the same auction drives up your own CPC. You are competing with yourself and paying for it.
How harvested keywords should feed your listing SEO
Harvested terms are conversion-proven language. That is what makes them valuable for listing optimization, not just PPC. But the timing matters.
- Validate in ads first. Wait until a term has demonstrated consistent conversions across at least two weekly harvest cycles before editing your listing. A single week of data can be a seasonal spike or a fluke.
- Front-end copy: title and bullets. Place your highest-converting harvested terms in the product title and the first two bullet points. Amazon’s A10 algorithm and the COSMO semantic layer reward structured, answerable copy over dense keyword strings. A harvested term that converted 10 times earns its place in the title. A term with one conversion does not.
- Backend search terms. Use this field for validated terms that did not fit naturally into the title or bullets. Avoid duplicating keywords already present in front-end copy — the backend field is for incremental coverage, not repetition. Include abbreviations, alternate names, and close variants.
- A+ Content and Q&A. Use harvested terms to inform the language in your A+ Content modules and to seed answers in the Q&A section. These surfaces feed Amazon’s semantic indexing and are increasingly relevant for Rufus and Alexa for Shopping queries.
Outdated tactics like keyword stuffing no longer move the needle. A readable title built around two or three high-converting harvested terms outperforms a title crammed with synonyms. The conversion data from your ads is the best evidence you have for which terms deserve front-end real estate.
Tools, automation, and where Selloop fits into the workflow
Manual harvesting works. It also takes 30–45 minutes per week per product, and that compounds fast across a large catalog. Automation handles the mechanical steps so you can focus on decisions.
Common automation patterns:
- Rules-based workflows: set conditions in Campaign Manager (e.g., “if clicks ≥ 10 and orders ≥ 1, flag for review”) to surface candidates automatically
- Scheduled exports: automate Search Term Report downloads via the Amazon Advertising API or third-party connectors so data is ready when you sit down to harvest
- API-driven changes: push keyword additions and negatives programmatically, reducing manual entry errors
Phased validation is the standard best practice before applying rules at scale. Test automation on a small set of SKUs first, confirm the outputs match what you would have done manually, then expand.
Where Selloop fits:
- Automatically identifies converting search terms and surfaces them as harvest candidates with data-backed justification
- Applies promote-and-negate changes with one-click approval, so you review the recommendation rather than build it from scratch
- Provides bid recommendations based on historical CPC data from the source campaign
- Tracks the downstream impact of every change over a 21-day window so you can confirm whether a graduation actually improved performance, without reconciling spreadsheets manually
- Campaign health scoring flags accounts that are drifting or accumulating waste between harvest sessions
Pro Tip: Before rolling out any automation rule to your full catalog, run it on three to five SKUs for two weeks. Compare the automated outputs against what your manual process would have produced. If they match, scale. If they diverge, find the gap before it costs you.
How to measure success and verify the impact of harvesting
Harvesting without measurement is just reorganizing your campaigns. You need a verification playbook.
Tracking checklist before making changes:
- Record baseline ACoS, TACoS, total spend, and orders for each affected campaign
- Note the current CPC for every term you are graduating
- Capture the date of each change so you have a clean before/after reference point
Verification window: Selloop uses a 21-day tracking window by default, and the rationale is sound. Amazon’s attribution window for Sponsored Products is 7 days for clicks, but campaign performance stabilizes more slowly. Fourteen days catches most of the signal; 21 days gives you confidence that a lift is real and not a short-term fluctuation. For high-volume campaigns, 14 days may be sufficient. For lower-traffic products, 21 days is the safer floor.
Simple holdout approach:
- When graduating a term, leave one similar-volume term in the auto campaign without graduating it for the same period
- Compare ACoS and conversion rate between the graduated term (now in exact match) and the holdout term (still in auto)
- If the graduated term shows lower ACoS and stable or higher conversion rate after 21 days, the graduation worked
What to look for after 21 days:
- ACoS on the new exact-match keyword vs. the historical ACoS in auto
- CPC on the exact-match keyword vs. the CPC observed in the source campaign
- Whether the auto campaign’s spend shifted to genuinely new search terms (a sign negatives are working)
- Total account TACoS trend over the period
If a harvested keyword is converting at ACoS well below your target after 30+ days, that is a proven performer. Increase the bid 10–15% to capture more impression share before a competitor does.
Key Takeaways
Disciplined weekly harvesting compounds over time: sellers who run the export-filter-graduate-negate loop consistently build a library of proven exact-match keywords at controlled bids, leading to lower ACoS than where they started.
| Point | Details |
|---|---|
| Run the weekly loop | Download the Search Term Report every 7–14 days, filter for at least 8 clicks, and act on every qualifying term. |
| Always negate the source | Add every graduated term as a negative exact match to the source campaign or you will bid against yourself. |
| Use minimum-data thresholds | Require at least 8 clicks and 1 order before graduating; acting on fewer clicks promotes statistical noise. |
| Feed harvested terms to listing SEO | Validate conversions in ads first, then place proven terms in titles, bullets, and backend search fields. |
| Verify impact over 21 days | Track ACoS, CPC, and TACoS before and after each change; Selloop automates this tracking window. |
The discipline gap is where most sellers lose
Most sellers understand keyword harvesting conceptually. The gap is operational. They run the process once, see a modest ACoS improvement, and then skip it for three weeks because something else demands attention. By week four, the auto campaign is spending on terms the exact-match campaign already owns, CPCs are creeping up, and the gains from that first harvest session have quietly eroded.
The sellers who compound gains from harvesting are not doing anything technically sophisticated. They are doing the same 30-minute loop every week without exception. The weekly cadence is not arbitrary — daily harvesting produces too little data per term to make reliable decisions, and monthly harvesting lets wasted spend compound for weeks before you catch it. Seven to fourteen days is the window where you have enough signal to act and enough frequency to stay ahead of drift.
There is also a tendency to over-automate too early. Rules-based harvesting is powerful, but applying it across a full catalog before validating the logic on a handful of SKUs is how sellers accidentally negate converting terms at the account level and kill performance across multiple campaigns simultaneously. Phased rollout is not caution for its own sake — it is the difference between automation that saves 30 minutes a week and automation that creates a two-week recovery project.
Selloop was built specifically for this operational reality. The 21-day tracking window exists because sellers need to see whether a change actually worked, not just that it was applied. One-click approval keeps you in control of the decision while removing the manual report-scrubbing that makes the weekly loop feel like a chore.
Selloop turns the weekly harvesting loop into a one-click routine
Spending 30–45 minutes per week per product on manual report downloads, spreadsheet filters, and bid calculations adds up fast. Selloop cuts that to minutes. The platform analyzes your Sponsored Products and Sponsored Brands campaigns, surfaces harvest candidates with clear data justification, and applies promote-and-negate changes the moment you approve them.
Every change Selloop makes is tracked over a 21-day window so you can see exactly whether a graduation improved ACoS or a negation freed up budget for better terms. No spreadsheet reconciliation. No guessing whether last week’s changes helped. Campaign health scoring flags accounts that are drifting between sessions, and bid recommendations are grounded in the historical CPC data from your own source campaigns.
Plans start at €29/month with a 7-day free trial. No long-term contract required. If you manage multiple accounts or run an agency, tiered pricing scales with your ad spend. Start your free trial and run your first automated harvest this week.
Useful sources
- Amazon PPC Keyword Harvesting Routine (Weekly) — AmazonFBA.org: the most detailed practitioner guide on the 6-step weekly process, click thresholds, and the promote-plus-negate loop.
- Keyword Harvesting in Amazon PPC: How It Works — SellerStack: concise definition and the core mechanics of the search-term graduation workflow.
- Amazon Keyword Harvesting: The Complete Guide to Search Term Graduation — Pilothouse Digital: strong on campaign architecture and why graduation concentrates spend on converters.
- Improve product visibility through effective Amazon keyword research — Sell on Amazon: Amazon’s own guidance on keyword placement, Brand Analytics tools, and backend search term best practices.
- Amazon SEO in 2026 — Neal Schaffer: covers COSMO, A10, and why structured listing copy outperforms keyword density.
- Amazon SEO in 2026: How to actually rank higher — GrowWithBa: practical guidance on avoiding keyword stuffing and using harvested terms in readable listing copy.
- Selloop.ai — AI Amazon PPC Management: product documentation on automated harvesting, 21-day tracking, and campaign health scoring.
- Amazon Negative Keywords: Cut Waste and Win More Sales — Selloop.ai: dedicated deep-dive on negative keyword strategy and preventing cannibalization.